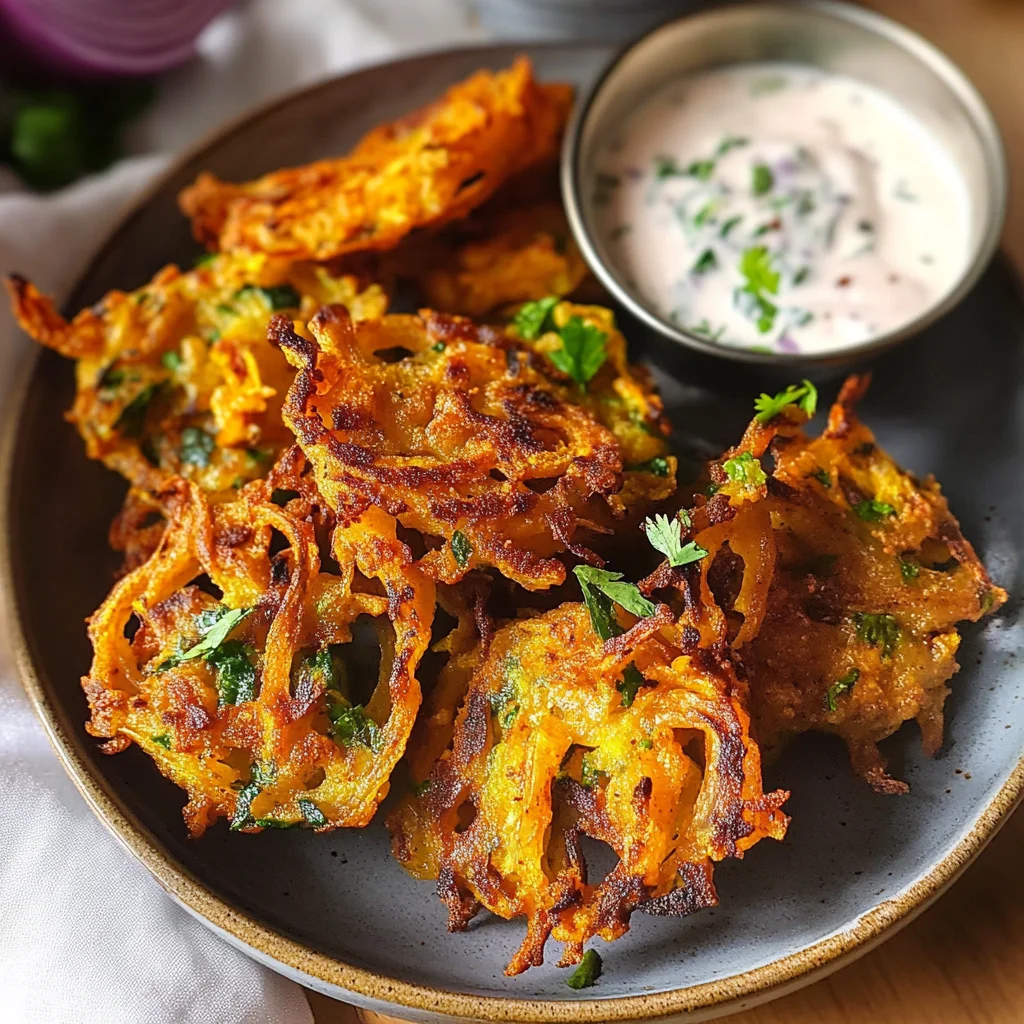
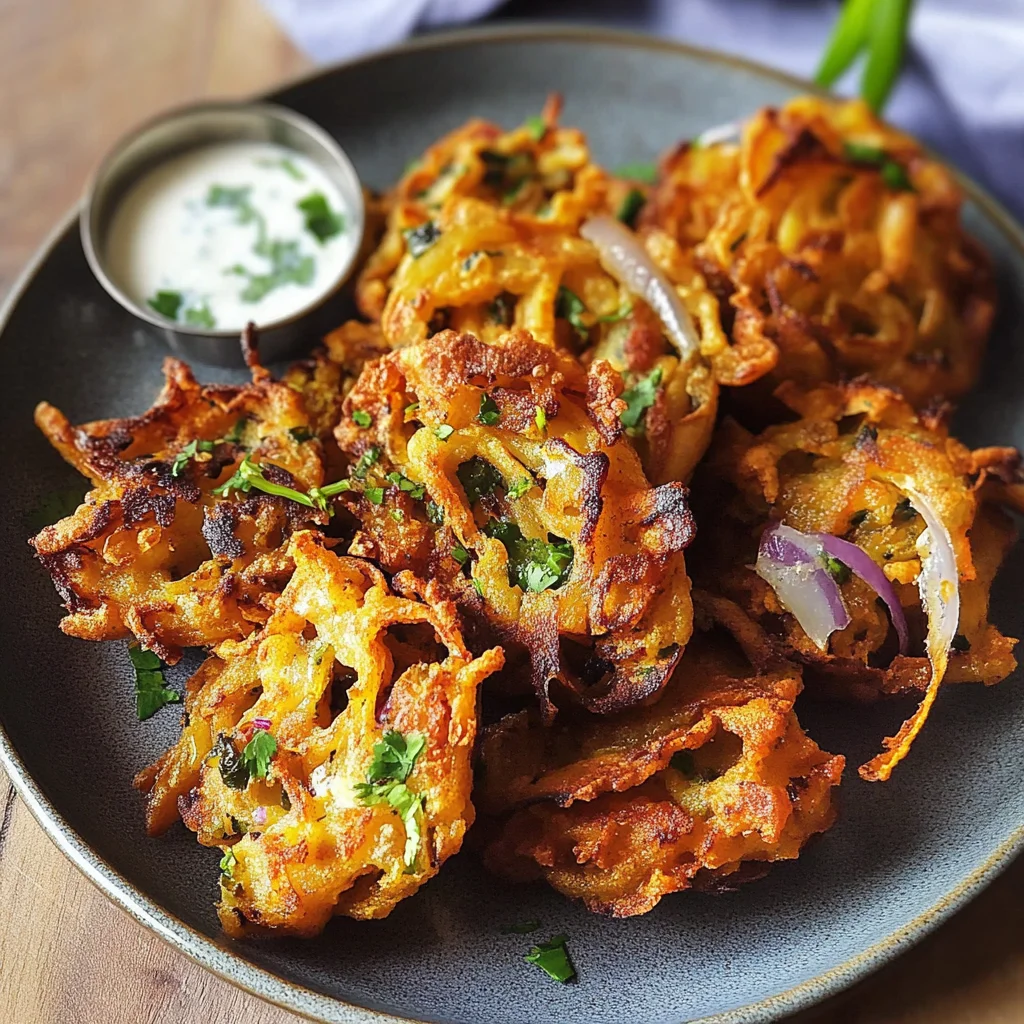
Indian Onion Bhaji
Enjoy crispy, light, flavorful homemade Indian Onion Bhaji with just one tablespoon of oil per 4 fritters! These delightful onion fritters are perfect for any occasion, whether as a snack, appetizer, or side dish. With their spiced chickpea flour batter and crunchy texture, they offer a unique taste experience that will impress your family and friends. Plus, they’re gluten-free, egg-free, and vegan!
Why You’ll Love This Recipe
- Healthy Ingredients: Made primarily from chickpea flour and onions, these bhajis are nutritious and easy on the waistline.
- Quick to Prepare: With just 10 minutes of prep time and 15 minutes of cooking time, you can whip up a delicious snack in no time.
- Versatile Serving Options: Serve them with chutney, yogurt, or even on their own—perfect for any gathering!
- Crispy Texture: The frying method gives these bhajis a satisfying crunch that pairs wonderfully with their soft interior.
- Vegan and Gluten-Free: Enjoy without worry—these fritters fit various dietary needs.
Tools and Preparation
To make Indian Onion Bhaji efficiently, having the right tools is essential. Here’s what you’ll need:
Essential Tools and Equipment
- Large mixing bowl
- Whisk or fork
- Sharp knife or mandoline
- Large skillet
- Tongs
Importance of Each Tool
- Large mixing bowl: Allows you to mix all ingredients without spillage.
- Sharp knife or mandoline: Ensures thinly sliced onions for even cooking.
- Large skillet: Provides enough space for frying multiple fritters at once.
Ingredients
For the Indian Onion Bhaji
- 2 medium onions (sliced)
- 1 cup chickpea flour
- 1 Tbsp nutritional yeast (optional)
- 3/4 tsp ground cumin
- 3/4 tsp salt
- 1/2 tsp ground turmeric
- 1/2 cup water
- 1 tsp lime juice (or lemon juice)
- 1 green hot chili pepper (finely chopped)
- 1 Tbsp parsley (chopped or cilantro)
- 3 Tbsp oil (for frying; I used coconut)
How to Make Indian Onion Bhaji
Step 1: Slice the Onions
First, peel the onions and use a sharp knife or mandoline to slice them into thin strips. Set them aside in a bowl.
Step 2: Prepare the Batter
In a large mixing bowl, combine all remaining ingredients except the oil. Whisk together until you form a medium-thick batter. If it appears too thick, add water one teaspoon at a time until the desired consistency is reached.
Step 3: Mix in the Onions
Add the sliced onions to the batter. Use your hands to mix well until all onion strips are fully coated in the batter.
Step 4: Heat the Oil
Heat a large skillet over medium heat and add at least one tablespoon of coconut oil. Allow it to get hot before adding the bhajis.
Step 5: Fry the Bhajis
Using tongs, drop small portions of the battered onion into the heated pan—cook about four fritters at a time. Fry for approximately 2–4 minutes on each side until golden brown and crispy.
Step 6: Serve
Once cooked, remove from the skillet and let drain on paper towels if desired. Repeat with remaining batter mixture and enjoy your homemade Indian Onion Bhaji!
How to Serve Indian Onion Bhaji
Indian onion bhaji is a versatile dish that can be served in various ways. Whether as an appetizer, snack, or side dish, these crispy fritters are sure to delight your taste buds. Here are some creative serving suggestions to enhance your Indian onion bhaji experience.
With Chutney
- Mint Chutney: A refreshing dip that complements the spiciness of the bhaji.
- Tamarind Chutney: Adds a sweet and tangy flavor that pairs perfectly with the crispy texture.
As a Sandwich
- In a Pita Pocket: Stuff the onion bhaji into a pita with fresh veggies for a hearty snack.
- On a Bun: Create a delicious slider by placing the bhaji on a small bun with toppings like lettuce and tomato.
On a Salad
- Crispy Topping: Use onion bhaji as a crunchy topping on salads for added texture and flavor.
- In a Grain Bowl: Add bhaji to grain bowls with quinoa or rice, topped with fresh veggies.
With Dips
- Yogurt Dip: Serve with a side of yogurt mixed with herbs for cooling contrast.
- Spicy Mayo: A zesty mayo can enhance the flavors and add creaminess.
How to Perfect Indian Onion Bhaji
Perfecting your Indian onion bhaji takes practice and attention to detail. Here are some tips to help you achieve crispy and flavorful fritters every time.
- Batter Consistency: Ensure your batter is medium-thick; too runny will result in soggy bhajis.
- Oil Temperature: Heat oil adequately before frying; this ensures even cooking and crispiness.
- Onion Slicing: Slice onions thinly for better coating and quicker frying.
- Batch Cooking: Fry in small batches to maintain oil temperature and ensure even cooking.
- Spice Adjustments: Customize spices according to your preference for heat or flavor depth.
Best Side Dishes for Indian Onion Bhaji
Pairing side dishes with your Indian onion bhaji can elevate your meal. Here are some delicious options that complement the flavors of this popular snack.
- Chickpea Salad: A light salad made with chickpeas, tomatoes, and cucumbers. Refreshing and nutritious!
- Cucumber Raita: A cooling yogurt-based dish that balances the spice of the bhaji.
- Vegetable Biryani: Fragrant rice cooked with vegetables and spices adds heartiness to your meal.
- Aloo Gobi: A comforting combination of potatoes and cauliflower spiced just right.
- Paneer Tikka: Grilled paneer marinated in spices complements the crunch of bhajis beautifully.
- Samosas: These stuffed pastries provide another layer of flavor and texture alongside onion bhaji.
Common Mistakes to Avoid
Making Indian onion bhaji can be a delightful experience, but there are common missteps to watch out for.
- Incorrect Onion Slicing: Slicing onions too thick can lead to uneven cooking. Aim for thin strips for even frying and crispy results.
- Ignoring Batter Consistency: A batter that is too thick won’t coat the onions well. Adjust with water until you achieve a medium-thick consistency.
- Overcrowding the Pan: Cooking too many fritters at once can lower the oil temperature. Fry in small batches to ensure they cook evenly and become crispy.
- Inadequate Heating of Oil: If the oil isn’t hot enough, the bhajis will absorb more oil and become greasy. Test the oil by dropping a small amount of batter; it should sizzle immediately.
- Skipping Seasoning Adjustments: Not tasting your batter may lead to bland bhajis. Adjust spices according to your preference for a more flavorful dish.
Storage & Reheating Instructions
Refrigerator Storage
- Duration: Store in the refrigerator for up to 3 days.
- Container: Use an airtight container to keep them fresh.
Freezing Indian Onion Bhaji
- Duration: Freeze for up to 1 month.
- Container: Place in a freezer-safe bag or container, ensuring as much air is removed as possible.
Reheating Indian Onion Bhaji
- Oven: Preheat oven to 350°F (175°C) and bake for about 10-15 minutes until heated through and crispy.
- Microwave: Heat on medium power for 30 seconds, but this may result in sogginess; not recommended.
- Stovetop: Reheat in a skillet over medium heat with a splash of oil until warmed and crispy.
Frequently Asked Questions
If you’re curious about Indian onion bhaji, here are some common questions answered.
How do I make Indian onion bhaji gluten-free?
You can easily make them gluten-free by using chickpea flour, which is naturally gluten-free.
Can I customize my Indian onion bhaji?
Absolutely! Feel free to add other vegetables or spices like garlic or ginger for extra flavor.
What dips pair well with Indian onion bhaji?
Mint chutney, tamarind sauce, or yogurt-based dips complement these fritters beautifully.
Is Indian onion bhaji suitable for vegans?
Yes, this recipe is vegan-friendly since it contains no eggs or dairy products.
Final Thoughts
Indian onion bhaji is a fantastic appetizer that offers a crispy texture and rich flavors. They are versatile enough to be enjoyed as snacks or served alongside main dishes. Experiment with spices and dips to create your perfect version!
Indian Onion Bhaji

Indulge in the crispy, flavorful delight of homemade Indian Onion Bhaji with minimal oil—just one tablespoon per four fritters! These delectable onion fritters are perfect for any occasion, whether as a snack, appetizer, or side dish. Coated in a spiced chickpea flour batter and fried to golden perfection, they offer a unique taste that is sure to impress family and friends. Plus, they cater to diverse dietary needs as they are gluten-free, egg-free, and vegan!
- Prep Time: 10 minutes
- Cook Time: 15 minutes
- Total Time: 25 minutes
- Yield: About 12 fritters (serves approximately 3) 1x
- Category: Appetizer
- Method: Frying
- Cuisine: Indian
Ingredients
- 2 medium onions (sliced)
- 1 cup chickpea flour
- 1 Tbsp nutritional yeast (optional)
- 3/4 tsp ground cumin
- 3/4 tsp salt
- 1/2 tsp ground turmeric
- 1/2 cup water
- 1 tsp lime juice (or lemon juice)
- 1 green hot chili pepper (finely chopped)
- 1 Tbsp parsley (or cilantro)
- 3 Tbsp oil (for frying; coconut recommended)
Instructions
- Slice the onions thinly and set aside.
- In a large mixing bowl, combine chickpea flour, nutritional yeast (if using), cumin, salt, turmeric, water, lime juice, chili pepper, and parsley. Whisk until you have a medium-thick batter.
- Mix in the sliced onions until fully coated.
- Heat oil in a large skillet over medium heat.
- Drop spoonfuls of the batter into the hot oil, frying about four fritters at a time for 2–4 minutes on each side until golden brown.
- Drain on paper towels and serve hot.
Nutrition
- Serving Size: 4 fritters (80g)
- Calories: 180
- Sugar: 1g
- Sodium: 330mg
- Fat: 7g
- Saturated Fat: 4g
- Unsaturated Fat: 3g
- Trans Fat: 0g
- Carbohydrates: 24g
- Fiber: 5g
- Protein: 6g
- Cholesterol: 0mg